
Set-up patient

Set up the patient in Cortrium Apex software, place C3w and electrodes on the patient

Firstly, you need to prepare your C3w Monitor for a new recording using the Cortrium Apex software.

Note: To start a new recording, you need to install the Cortrium Apex software, first. Install it here.

  1. Check that the battery is fully charged. A full battery is indicated with a constant green light. You can also see the charging status in Cortrium Apex.
  2. Place the C3w monitor in the adapter, ensuring that the charging pins and charging pads are aligned. Connect the adapter to a computer using the USB-C cable, then open the Cortrium Apex software.
  3. In the menu, click on Open Device and make sure that your monitor is connected properly.
  4. To proceed, please select “Erase all and prepare for new patient”.
Important: Step 4 will permanently delete all existing recordings on your C3w monitor. If you have existing recordings, please process your recordings, first.
  1. Enter the required patient information. This information is used to help you identify the recording in the Cortrium Apex software and on the final reports.
  2. Please choose a recording length in the dropdown menu. Finally, click “Save to device”.
  3. To continue attaching the monitor to a patient, please select “Safely unplug device” before unplugging your C3w monitor.

When preparing your patient, you need to make sure to shave all hair in the area where the electrodes will be placed.

Important: If the area is not shaved, the electrodes might detach from the skin during the recording.
  1. Please make sure to shave all hair in the area where the electrodes will be placed.
  2. Continue with cleaning the skin, preferably with a cotton swab and appropriate alcohol.
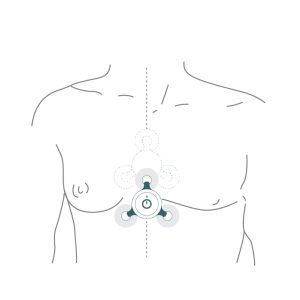
  3. The C3w monitor should be placed vertically on the midsternal line, as shown in the following picture.
  1. Take the C3w monitor out of the adapter. Turn the C3w monitor over and attach one electrode to each of the three electrode connectors. Carefully remove the plastic from the adhesive surface of the electrodes.
  2. Note: Before attaching the C3w monitor, please turn the monitor in the right direction, so that the small green line points upwards.
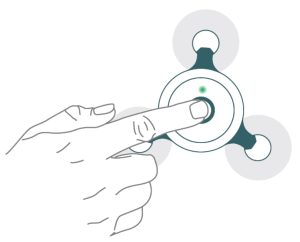
  3. Please make sure that the adhesive sticks properly to the skin and that there is no air between the electrodes and the skin. We recommend exercising light pressure on the edges of the electrodes to double-check that they stick to the skin properly.
  4. Now, simply press the button to start the recording. The green light might start to flash fast in the beginning but will turn to a constant slow pattern after some seconds, indicating that the device is now recording.

As a final step, please instruct your patient on how to use the Holter monitor throughout daily activities.

To achieve optimal results, the device should be worn at all times.

Please instruct them to not remove the electrodes. When the device has no contact to the skin, it will flash white.

Note: In our Quick Start guide, you can find a detailed explanation of all light patterns and their meanings. View Quick Start Guide

With our logbook, patients can keep track of any symptoms that they feel while wearing the monitor. If your patient experiences discomfort or pain during the recording, the button should be pushed once. This marks an event and helps you to analyze the recordings afterwards.

Download logbog here